How to Integrate JMeter with Grafana
1.Install and Configure InfluxDB
First of all, we need a JMeter performance script to test.
As soon as we have the performance script in place, we need to take care of the InfluxDB and Grafana installation.
First of all, we need to install InfluxDB as a permanent storage space for our performance metrics.
1.Download InfluxDB and install:- https://portal.influxdata.com/downloads/
2.Unzip the setup file (influxdb-1.8.0_windows_amd64) for windows
3.Run influxd (application file by double-clicking it) it will up and running.

4.Run influx to execute the commands.
3.Run influxd (application file by double-clicking it) it will up and running.

4.Run influx to execute the commands.
To verify that InfluxDB is up and running, all you need to do is to open a terminal window and run this command:- influx
If the installation was completed successfully and the database is up and running, you will see an InfluxDB command-line interface. This can be used for interacting with the database.
By using the ‘SHOW DATABASES’ command, you can see the list of all existing InfluxDB databases. If you have just installed InfluxDB you should see only one ‘_internal’ database, which is used for keeping different stats about database itself.
At this point, we can create a new database to store our performance metrics. For that you need to be logged in influx command-line interface and run this command: CREATE DATABASE jmeter
After that you should see your newly created database, by using the same ‘SHOW DATABASES’ command we used in the previous step:
Once we have created a database for our metrics, we need to make a few changes to the InfluxDB configuration. The configuration file is located at this location:
"<Rootfloder>\influxdb-1.7.7_windows_amd64\influxdb-1.7.7-1\influxdb.conf"
In this configuration file you need to find, uncomment and edit the ‘[[graphite]]’ category appropriately:
[[graphite]]
# Determines whether the graphite endpoint is enabled.
enabled = true
database = "jmeter"
retention-policy = ""
bind-address = ":2003"
protocol = "tcp"
consistency-level = "one"
batch-size = 5000
batch-pending = 10
batch-timeout = "1s"
udp-read-buffer = 0
separator = "."
After that you need to restart InfluxDB by applying an edited configuration:
"<Rootfloder>\influxdb-1.7.7_windows_amd64\influxdb-1.7.7-1>influxd -config influxdb.conf"
Congratulations! We have completed the first step of our long road to establish the integration of JMeter with Grafana monitoring. Now it’s time to push the metrics into the database we created.
Push Performance Metrics from JMeter to InfluxDB
To push performance metrics from JMeter to InfluxDB, we need to use the Backend Listener. This listener enables writing metrics directly to the database.
Let’s add the Backend Listener to our performance script:
- Backend Listener implementation - this is an implementation class that will be used as a listener for JMeter test metrics. The value for this parameter is based on the protocol we are going to use. If you remember, we used the graphite protocol configuration specified to the InfluxDB configuration. For this, we need to use the ‘GraphiteBackendListenerClient’
There are different types to send metrics to InfluxDB
Type1:- Jmeter Load Test DashBoard

Configure the Backend Listener:

Type2:- Apache Jmeter DashBoard using Core

Configure the Backend Listener:

Type 3: Jmeter Dashboard

Configure the Backend Listener:
- Once the configuration is in place, we can run our test execution.
After the test execution is completed, we can check the InfluxDB and verify that our metrics were reported there successfully. To do so, open the InfluxDB command line interface again and use this command:
> USE jmresults
> SHOW MEASUREMENTS
> SELECT * FROM “jmeter.all.a.avg”
We should find metrics with a timestamp and an appropriate value:

Now that we see that all metrics were reported successfully from JMeter to InfluxDB, we are ready for the last step - visualize reported metrics using Grafana.
Monitoring Performance Metrics in Grafana
First of all, let’s install Grafana on our local machine:- https://grafana.com/grafana/download
After that, Grafana should be available on http://localhost:3000. Use ‘admin’ as default username and password to log in.

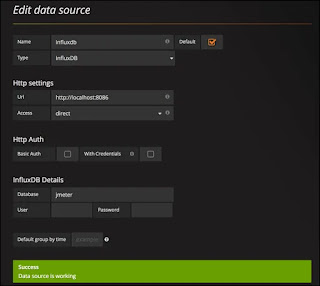
First of all, we need to specify the data source with our metrics. Click on “Add data source” on the welcome page:

On the next page put the appropriate configuration based on our previous steps, and click on the “Add” button to verify that Grafana can connect to InfluxDB:
Now we can import our first dashboard in Grafana. Open the Grafana menu by clicking on the top left button and go to Dashboards -> Import:
After that, Grafana should be available on http://localhost:3000. Use ‘admin’ as default username and password to log in.

First of all, we need to specify the data source with our metrics. Click on “Add data source” on the welcome page:

On the next page put the appropriate configuration based on our previous steps, and click on the “Add” button to verify that Grafana can connect to InfluxDB:

Now we can import our first dashboard in Grafana. Open the Grafana menu by clicking on the top left button and go to Dashboards -> Import:

then type dashboard id:5496 or 4026 or 1152 and click on Load


No comments:
Post a Comment